Quick start
What is Permian
Permian is plugin based universal testing pipeline, that handles execution of various workflows based on events and reporting of interim and final results.
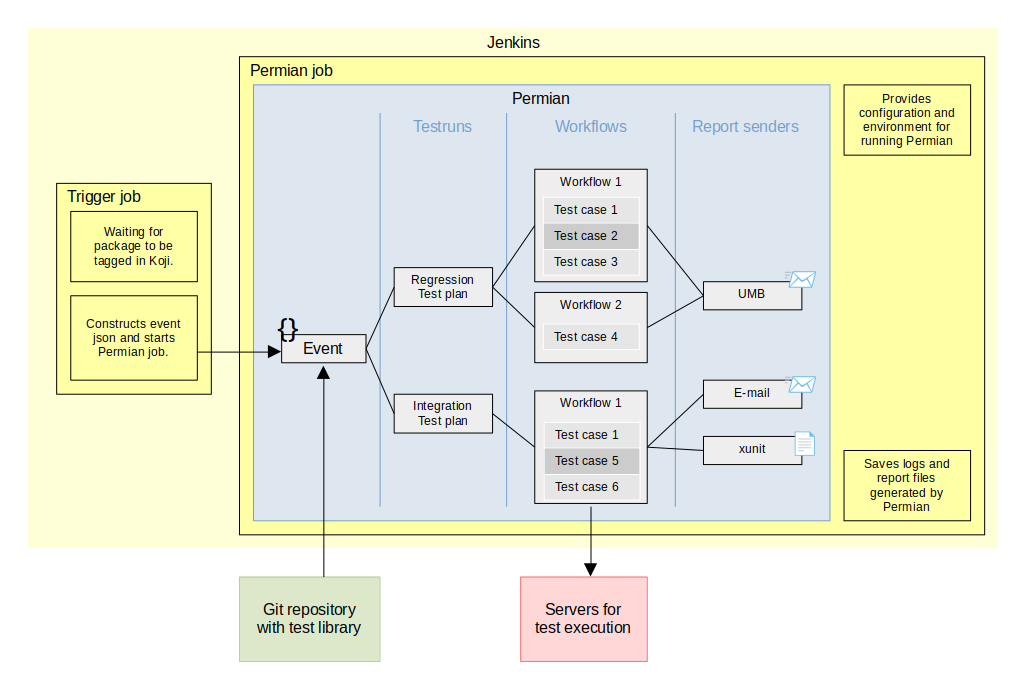
Here is an simplified diagram of one of the possible deployments of Permian. Just to give you an idea what Permian does.
First execution
We are going to run Permian in a container to avoid installing all its dependencies. In the example bellow we are using special test plugin and test library, usually reserved for testing Permian itself. The test plugin contains: Event, EventStructure, Workflow and ReportSender that can all be used without any configuration.
Clone Permian repository:
git clone https://github.com/rhinstaller/permian.git
cd permian
Build container image for running Permian. This will create image with tag “permian”:
./build_container
Run Permian: We need to enable plugin test, specify path to testplan library and then we can use run_event command with event type test and test event structure:
PIPELINEPLUGINS_ENABLE=test ./in_container ./pipeline -o library.directPath=./tests/test_library run_event '{"type": "test", "test": {"testplans": "testing plugin plan 2"}}'
Note
In this case we use event structure test that directly specifies test plan name to run. But this isn’t the case for normal event structures they instead should provide description of the test object. For example koji Event structure provides package name, new tag, build id, etc. and Permian then decides what test plans should be run based on the information in test library.
While Permian is running you can see the progress in WebUI, the URL will be printed like this:
INFO:libpermian.webui.callbacks(Thread-2):WebUI started at: http://10.0.2.100:52805/
Because we are running Permian in container, you have to change the printed IP to localhost. But in this case Permian will end before you can do that. Fortunately the WebUI is saved in static form after Permian ends. To view it we just have to start simple http server and open the url printed by the python command, usually http://0.0.0.0:8000/.:
python3 -m http.server
Note
Some tast cases in testing plugin plan 2 are expected to fail.
Without container
Some plugins may use its own container to do stuff, and rather than working-out the container in container issue it may be easier to run Permian outside container. Following commands should work on latest Fedora.
Add beaker-client repo (if you do not have it already):
sudo dnf config-manager --add-repo https://beaker-project.org/yum/beaker-client-Fedora.repo
sudo dnf config-manager --enable beaker-client
Install dependencies:
sudo dnf install git make diffutils beaker-client \
    python3 python3-flask python3-requests \
    python3-libxml2 python3-yaml python3-magic \
    python3-pylint python3-bugzilla python3-productmd
Clone Permian:
git clone https://github.com/rhinstaller/permian.git
Clone tplib:
git clone https://github.com/rhinstaller/tplib.git
Same as in the example aboth we can try to run dummy test:
cd permian
PYTHONPATH=../tplib PIPELINEPLUGINS_ENABLE=test ./pipeline -o library.directPath=./tests/test_library run_event '{"type": "test", "test": {"testplans": "testing plugin plan 2"}}'
Next steps
For more information see Basic usage section and documentation for individual plugins.
Create your settings file. Before you start using Permian properly you are likely going to change some of the default settings. See: Settings section of this documentation to learn how to do that. Description of all possible options can be found in default settings files or in this documentation.
Create a test library. Now its time to create your own test cases and organize them in test plans and requirements. See: Test library section
Extend Permian with plugins (documentation TBD).
Setup CI. Permian was designed to be run inside CI systems like Jenkins.